

Anyone can create a process model. You may have never created one in your life but once you learn how you may find yourself scribbling them down on napkins at happy hour.
“What did you think of last night’s episode?” “Let me draw you a process model to show the plot twists.” Ok, so maybe not, but you’ll start noticing events, activities, and decisions all around you.
What are the benefits?
Creating process models is an incredibly useful skill for analyzing, communicating, and improving or designing new processes from scratch.
They can be useful for both teams and individuals to map out ideas or solve problems. You can jot down a quick model or go crazy and model every single detail. It’s a flexible tool that’s great to have in your analyst survival kit.
Ways process models can improve your life
More effective meetings
Since the syntax of a process model embodies a number of concepts, such as the order of the steps and decision points, you can easily model and communicate a process that would have been difficult to explain verbally.
People tend to not explain a process from start to finish, so drawing it out helps to highlight if they jumped to the middle, missed any steps, or only explained the happy path.
Process consistency
If you need to repeat the same process multiple times it can help to draw out the process for yourself or for your team. This is especially helpful for on-boarding or training.
Connect goals to how to “get it done”
Since you’ll start out with a high-level model and decompose that into more detailed models, the set of models can help bridge the strategic and tactical realms. Ex. I know I want to gather ingredients, cook dinner, and eat.
Overall that helps me plan my day but doesn’t tell me exactly what needs to happen. To execute the process I might need to break down the details of each step (such as how to make that dish I found on Pinterest).
Low-cost investigation and prototyping
Maybe the output of a process is lower quality than you would like and you don’t understand why. Maybe you’re not getting the expected throughput.
Mapping out the current state could help you identify causes that aren’t apparent. Modeling the to-be process is also a low-cost way to prototype and think about alternative ways to approach the process before ever investing in changes or executing it.
Let’s run through an example with something interesting, like planning a party.
Quickstart process modeling
Step 1) Determine why you are drawing the model
Are you trying to model the process so someone else can replicate it? Are you trying to answer a particular question? Ex. why are customers unhappy, why is the process taking so long, or are there any opportunities to automate?
It can be easy to either get carried away or overwhelmed by the idea of needing to model every detail. Keep your goal in mind and leave out details that are irrelevant to your goal. You can always add more detail later.
Example: My goal is to model the process to make sure everything runs smoothly.
Step 2) Define the boundaries of the process
Don’t try to model everything right out of the gate. Pick a starting point and an ending point for the process.
Example: Let’s say the process starts as soon as I pick a date and ends when the house is cleaned up after the party.
Step 3) Define the process participants
Who kicks off the process? Are they interacting with anyone else?
Example: To keep it simple I’ll say that I’m interacting with a group of guests.
Step 4) Write down the high-level tasks
Think about the “happy path” (the path that is followed the majority of the time) and the high-level steps. Start with the “elevator pitch” of a process model. If you only had 1 minute to explain a process to a high-powered executive what would you say? We’ll get to the details later. Try to keep the # of steps low.
This framework may help: [participant] + [verb] + [noun]
Example:
I create a guest list.
I send out invitations for the party.
I prepare the house for the party.
I host the party./Guests attend the party.
I clean up after the party.
Step 5) Draw out the process
We’ll use Business Process Modeling Notation (BPMN) in this case. It’s basically a standardized notation for documenting business processes. I highly recommend learning this notation because it is internationally recognized and there is a large body of knowledge out there describing the notation rules so you never have to worry about defining your own. If that wasn’t enough it’s also a recognized skill that you could add to your resume.
What tool should you use? I always start by sketching out the process on paper before moving to Microsoft Visio, but there are some other great alternatives out there such as LucidChart.
Example:
First, we’ll start by creating “swimlanes.” The swimlanes represent the participants in the process (that we defined back in step 3). Since all of the guests will follow the same steps in this model we will model them all in the same swimlane. If you instead wanted to model the actions of multiple people separately, you would need to break them out into separate lanes.
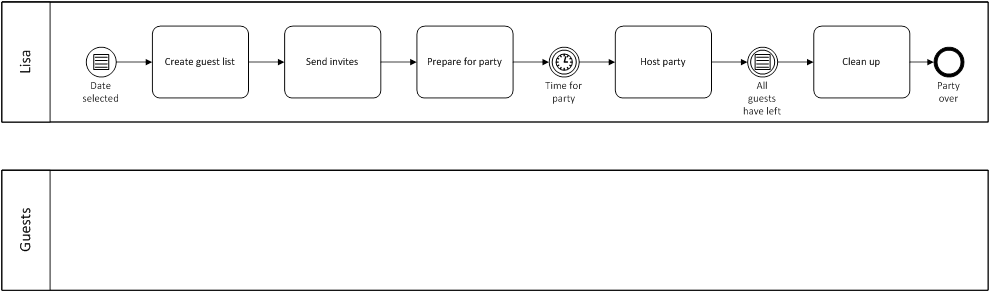
Next, I’ll draw out where the process starts, where it ends, my actions and a few intermediate events during the process. The circles below represent events in the process.
The process starts with a conditional event (that’s the hamburger menu icon), meaning it is only triggered when I select a date for the party. After that event I complete three tasks, 1) create a guest list, 2) send invites and 3) prepare for the party. The solid arrows represent the sequence flow, or the chronological order of events, tasks, and decisions.
There is an intermediate event, marked by the clock, which represents that I do not move onto the next task (hosting the party) until the party is scheduled to start. Finally, there is another conditional event that needs to occur before I move onto the last task, cleaning up after the guests.
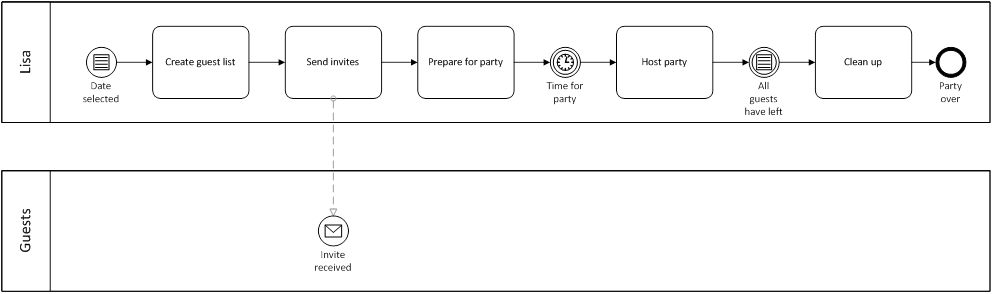
This model by itself is useful but I want to model what my guests are doing at the party as well. Since guests won’t spontaneously invite themselves over I need to send them a message first to trigger their process. The dashed line from the “send invites” activity represents the message flow, and the receipt of that message kicks off the process in the “guests” swimlane.
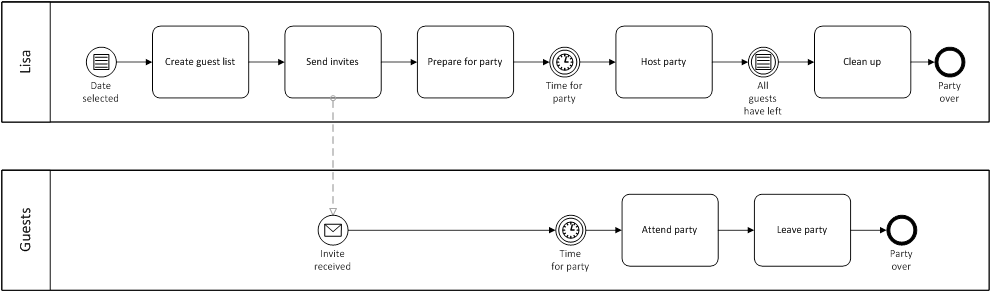
Now all that’s left is to complete the model. After the guests receive their invite the process does not move forward until the party is about to start, which is represented by the intermediate event with the timer. Guests attend the party and then leave the party, which is the end of their process.
Step 6) Share your model with others
At this point you’ll have a high level model to use as a basis for discussion. Does everyone agree that the steps are in the right order? In the right swimlane? Are there any major steps missing? Once you have consensus move onto the next phase.
Example: Maybe I share the process model with a friend and they decide to arrive earlier and leave later to help set up and clean up. Process improved.
Step 7) Process modeling upgrades
Once you get comfortable with the basics feel free to venture into the world of BPMN options. Are there any points in the process where a decision is made? Any artifacts created along the way? Any artifacts being referenced? Are the process participants using any tools?
Check out the resources below for more information about the range of symbols, tips, and common pitfalls when modeling with BPMN.
Additional resources
-
- The Object Management Group created and maintains the BPMN standard. You’ll find the official specification plus a lot of other documentation and examples on their site.
- Here are some tips for working with BPMN templates in Visio
- I strongly recommend Real-Life BPMN: Using BPMN 2.0 to Analyze, Improve, and Automate Processes in Your Company
for anyone getting started with BPMN. They provide approachable explanations for beginners and relevant examples.
Try out making your own models and let me know in the comments below if there are any questions or topics you’d like me to cover in a future post. Happy process modeling!
